



Garbage disposals split opinion. Some folks call them essential. Others think they’re just clutter. You don’t need one. But when it works? It’s magic. Your food scraps vanish. Gone. When it stops working? It’s a nightmare. You’re left with rotting food and no choice but to dig it out before you can even think about fixing the unit.
The good news is these things last. Years. With basic care. The bad news is that care is often ignored. Grease. Fibrous veggies. Large chunks. These are the enemies. If you feed them to the disposer, you’re asking for trouble. And never run it dry. Water is your friend. It sweeps the grindings down the pipe. Without water, that waste solidifies. It clogs. It stops everything.
How Garbage Disposals Work
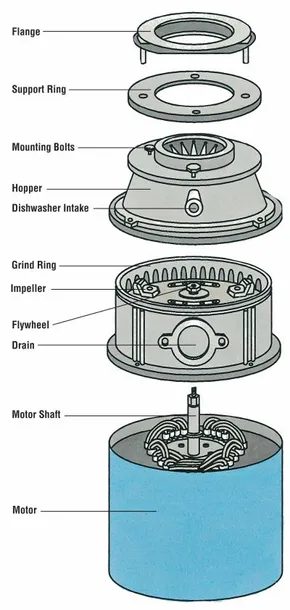
Understanding the mechanics helps you fix it. A disposal is basically a motorized chamber. Inside, a motor spins a flywheel. Attached to that flywheel are impellers. They’re loose. They spin. When food hits them, it gets hammered. Cut. Ground into tiny particles. Then the water flushes it out. Into the septic system or municipal sewer.
Some units have a secondary intake line. This connects to your dishwasher. The whole assembly sits under the sink, held tight by a flange, a locking ring, and mounting bolts. It’s simple engineering. But simple things break. Or jam.
How to Repair a Garbage Disposal
Most repairs fall into two categories. The flywheel is stuck. Or the seals have failed. Let’s start with the jam.
Servicing the flywheel
A jammed flywheel kills the motor. If you leave it on, it burns out. Don’t do that. The flywheel is usually easy to free. You don’t need to tear the unit apart immediately.
Step 1: Look at the bottom of the disposal. There is a six-sided (hex) hole centered there.
Step 2: Check for a hex wrench. It often comes in a small pouch attached to the side or bottom of the unit. If you have it, great. Use it. It rotates the motor shaft without opening the housing. If you don’t have one, dig through your toolbox. Or buy one. They’re cheap.
Step 3: Insert the hex wrench into that hole. Turn it. Back and forth. In circles. You should feel the resistance give way. The flywheel frees up.
Don’t see a hex hole? Or does the wrench do nothing?
Use a broom handle. Shorten it if you need to. Insert it through the drain hole from the top. Push it against one of the impellers. Apply leverage. Gently pry it. Move it in one direction. Then the other. Break the jam.
Servicing Hoses and Seals
Leaking water under the sink is common. It’s annoying. And potentially damaging to your cabinetry. But the source tells a story.
Look at the puddle.
Is it dirty? Discolored? That’s drain pipe or dishwasher intake leaking.
Is it warm? That’s almost certainly the dishwasher.
Is it clear? It might be coming from the sink faucet, before the water even hits the disposal.
Touch the unit. Carefully. Place your hand around the disposal body. Feel for streams. Pinpoint the leak.
Step 1: Feel for water. It often runs down the side of the housing. Your fingers can tell you where it starts.
Step 2: If the leak is at the bottom of the unit, the flywheel seal is likely gone. Water is getting into the motor chamber. This is serious. You need to remove the disposal from the drain system. Disassemble it. Replace the seal. Or take it to a pro. If you’re not comfortable taking it apart, don’t guess. Call someone.
Removing the Unit for Impeller Service
You might think replacing the whole unit is the only fix for a dull disposal, but servicing the impellers can often save you money and keep trash out of the landfill. It requires a bit more elbow grease than a quick reset, but the steps are straightforward if you respect the electricity and the weight.
First and foremost, kill the power. Unplug the disposal if it has a cord. If it is hardwired directly into the house, you have to trip the circuit breaker or remove the fuse at the main electrical box. Do not skip this. You are dealing with a motor that can turn heavy metal objects into projectiles if it gets energized while you’re working on it.
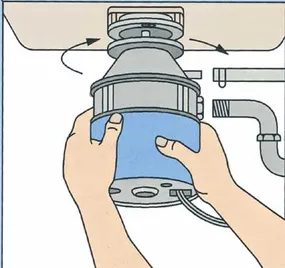
Once the power is dead, detach the plumbing. Remove all hose fittings leading into or away from the disposal. You will likely find one of two mounting systems. Some disposals simply twist off the support ring. Others require you to unscrew the unit from the ring. Be warned: a garbage disposer is a heavy appliance. When it finally comes free, its full weight drops into your hands instantly. Have a strong grip ready or have a spotter below to catch it.
With the unit on your workbench, you can tackle the impellers. On many models, you need to remove the flywheel first. Lock the flywheel in place with a screwdriver to prevent it from spinning. Then, loosen the flywheel lock nut.
Sharpening or Replacing Impellers
Once the flywheel is off, the impellers are exposed. You can remove them or sharpen them in place using a whetstone or a diamond file. The goal is to restore the beveled edge so the shredder teeth can grind food effectively again.
If the impellers are too worn to sharpen, or if they are cracked, you will need to replace the entire flywheel assembly. Trying to weld or glue them rarely holds up under the stress and moisture of daily use.
If the impellers cannot be sharpened, the flywheel assembly will need to be replaced.
Not every disposal problem is mechanical. From loose hoses to jammed flywheels, the issues are varied. Before you start taking things apart, check for clogs or tripped reset buttons on the bottom of the unit. If the motor hums but doesn’t turn, the flywheel might be jammed.